With the right techniques and methodologies, it is possible to produce a bright and stainfree product, but without knowledge and care, wedding dress cleaning can become a cleaner’s nightmare.
Skilful cleaning of a wedding dress calls on every aspect of the cleaner’s craft, from fibre identification through stain pre-treatment, spotting and finishing. Most wedding dresses are better wetcleaned rather than drycleaned, especially if they are heavily stained or soiled with food and drink. If colour change, shrinkage and fabric damage are to be avoided, wetcleaning demands an in depth understanding of textile properties and highly developed finishing skills, significantly above those required for drycleaning, but it usually produces a superb result if the appropriate precautions are taken. Most wedding day soiling and staining is water-based and therefore a water-based process is usually chosen by most cleaners. This also helps to maintain the brightness of white gowns over and above drycleaning. This normally gives excellent results with polyester and nylon, but with silk and acetate very careful evaluation of the garment, including the extent and nature of the soiling and stains is required. Polyester fabric is generally designed for wetcleaning or washing, and staining often comes away easily in water. A good detergent may be needed to treat oily staining. Conversely, some silk and acetate fabrics are at risk in washing, creating irremovable crackedice or basket-weave creasing with associated shrinkage. If a water-based process is required, to minimise problems a specific, gentle wetcleaning process is recommended. There are standard fibreidentification test techniques available (See Guild of Cleaners Stain Removal Notes) and these are essential if damage is to be avoided – a damaged wedding gown can lead to a very high claim! The actual methodologies involved should be varied as appropriate to the specific gown and it is acknowledged that those specialising in high end cleaning will have developed their own specific techniques.
Helping the customer with long-term storage by provision of professional acid free packaging will preserve a valuable heirloom. However, acceptance for cleaning of a garment that has not been correctly stored requires even more care if the customer’s expectations are to be met. Experienced cleaners will ask for the wedding date and budget for more work on old, set stains.
A great many wedding garment ranges are poorly constructed and poorly labelled and the consequences of this can be catastrophic for cleaners with little or no experience. In drycleaning, the solvent may soften or dissolve plastic beads or the mechanical action could fray an appliqué and a justified claim can then be expected.
It is usually necessary to use different techniques for finishing, starting with suspension of the gown, so that folds and different layers can be accessed easily and quickly. Ruching presents extra problems, but there are techniques for handling layers of soft folds to enable this to be re-created, without clumsy hard creases which ruin the appearance and result in a complaint.
We look at varying techniques for stain removal and straightforward precautions to avoid cleaning errors such as greying. The importance of detergent charge, pre-drying and the use of distilled solvent cannot be over-emphasised.
Top Tips: optical brightening agents (OBAs) produce different shades of white on different fabrics, with much greater effect on cotton, silk and viscose than on polyester or nylon. We therefore strongly recommend avoiding the use of retail whitework detergents on white wedding gowns. These are designed for domestic washing and normally contain OBAs. We also recommend that, unless you are a specialist in wedding gown cleaning, you do not accept, for cleaning in-house, garments with care labels that dictate cleaning by Terrington Burchett, Grantham UK.
Conclusion
Drycleaning wedding gowns is not for the faint-hearted. The tips given will come in handy and recognise some of the disasters described. Good luck.
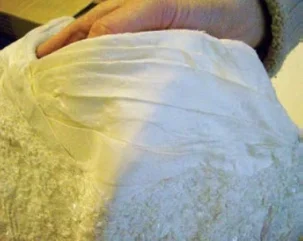
Ruching defeats the presser
Fault: after successful drycleaning, the operative was uncertain how to finish the layered ruching to the front of the bodice. Steaming did not produce much effect and gentle ironing resulted in creases in all the wrong places!
Technical cause: the ruching to the bodice should be ironed flat using a narrow iron, taking care not to set any creases at all. It might be necessary to snip some of the tacking stitches used to secure the ruching at this point. Once the fabric is creasefree, the ruched folds should be laid up by hand, working either on a steam-air former or using the air blower on a professional finishing table. Once the ruched folds are positioned correctly, they can be very lightly set with a puff of steam or brief vacuum. The secret is to use as little of these as possible consistent with achieving a good result. Then finally any tacking stiches may need to be restored.
Responsibility: the cleaner is responsible for correctly finishing the gown. Skills at Guild Advanced Level Garment Finishing are required. If these are not available, it is better to turn away or subcontract a ruched garment, because there is no real alternative and a justified claim is highly likely.
Rectification: provided incorrect creases have not been heavily set in, then recleaning and correct re-finishing using the method described is usually possible.
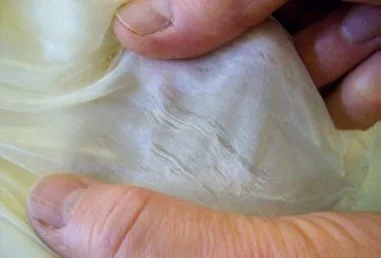
Fabric disintegrates under arm

Fault: after stain pre-treatment and drycleaning of this natural silk garment, the fabric at the under-arms was found to be disintegrating.
Technical cause: Untreated perspiration at the under-arms tends to become either acidic or alkaline with time, causing steady weakening of the yarns particularly if these contain silk. The damaged fibres are flushed away to produce the result seen here.
Responsibility: for the fabric damage lies with the user because it stems from staining in wear and the delay in getting the garment cleaned. However, the cleaner is responsible for giving realistic expectations at reception and should always ask the date of the wedding and then lower the customers’ expectations appropriately.
Rectification: The fabric damage cannot be improved and may get worse if the garment needs re-cleaning after retreatment.
How to treat hemline soiling

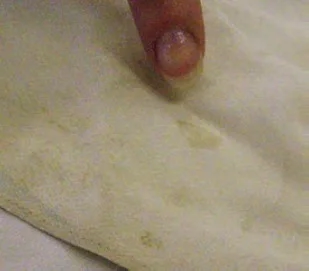
Fault: the cleaner did not want to risk pre-treating this expensive cream silk garment and after cleaning in hydrocarbon, the hemline soiling and staining was even more visible.
Technical cause: hemline soiling and staining usually contains mud particles with brown tannin (vegetable) staining from ground matter. Hydrocarbon solvent might flush out some of the looser particles, but it will not lift out the embedded particles and it will not decolour the brown tannin staining.
Responsibility: the responsibility for getting the soiling and staining onto the dress in the first place lies with the wearer, but the responsibility for failing to get better removal than seen here lies with the cleaner.
Rectification: although some of the embedded particulate soiling will have re-deposited during the first clean (and will therefore be held to the fibre surfaces by strong electrochemical forces). it should still be possible to get some improvement. The brown tannin staining should first be de-coloured with a tannin remover. Then, using bar soap or liquid soap with tepid/warm water and ideally working on a large table, gently tamp the soiled/stained areas with a soft brush. Then suspend over a shower tray (plumbed to drain), so that treated areas can be flushed clean with fresh water and then dripdry. Care is needed with silk to avoid any risk of abrasion damage, so gentle tamping is essential. When dry, any swealing in the hem area can be gently flushed out with the steam gun or, if necessary, a levelling agent applied and the garment re-cleaned.
Developed stain appears and gets worse in pressing

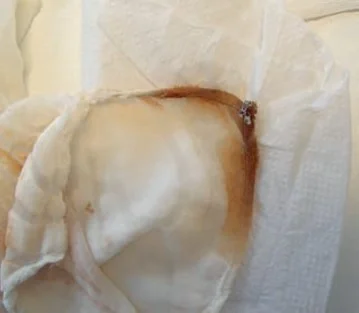
Fault: this wedding dress was virtually unmarked when put into the cleaning machine, but it came out with a brown mark on the sleeve, which darkened further before the presser noticed it.
Technical cause: this fault can be caused by caramelisation of sugars from white wine, lemonade or champagne, or it can result from oxidation of the proteins in milk or cream or meat fats. It did not reduce when the cleaner tried water warmed up with a steam gun, so it was not caramelised sugar. It slowly responded to a protein remover, so it may have come from meat juices.
Responsibility: the wearer was responsible for staining the item in the first place. If the stain was invisible before cleaning, the cleaner was not responsible for the failure to pre-treat. The responsibility for post-treating the mark correctly should now be taken by the cleaner.
Rectification: after testing, the mark should be treated with protein remover, tamped and left for around 20 minutes to soften (this is very important), before flushing with the water spray. If the mark is improved but not removed then this can be repeated, until there is no more improvement. Finally, bleaching with 9% peroxide may remove any residual stain. Simply re-cleaning is a waste of time, even with detergent prebrushing. This type of post-treatment of oxidised proteins requires patience and the right reagent and technique.


